| 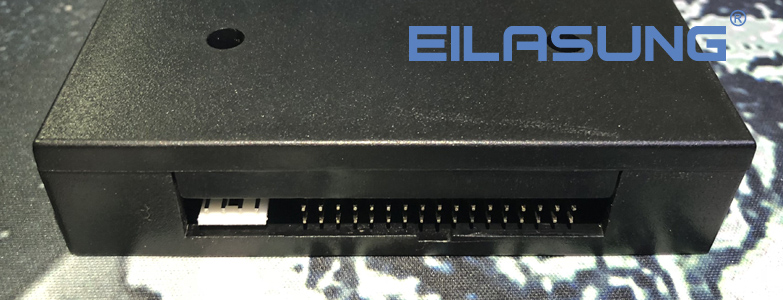
1. Install the FDD-UDD
(1). Turnoff the power, remove the floppy disk drive.
(2). Install the FDD-UDD on the floppy disk drive local, connect with the 5V power wire and 34-pin data wire which are used by the former FDD. Connect power wire first, connect the data wire later. And remove data wire first, power wire later.
Connection of power wire: connect the 5V power wire in device to FDD-UDD power wire.
In generally, the yellow wire is outside, red wire (VCC) is inside, black wire (GND) is in the middle. If the power wire is contrary, the chip in FDD-UDD maybe damaged.
Connection of data wire: connect the 34-pin FDC used by the former FDD to 34-pin data
wire in FDD-UDD. The data wire bulgy slot in FDD must match with groove slot in FDD-UDD. If the data wire is contrary, the FDD-UDD can’t work and even the chip will destroy. When the data wire is contrary, the red light is on while there is no USB Flash Drive is inserted.
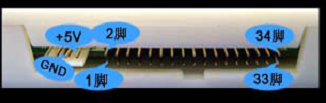
Figure 1-1
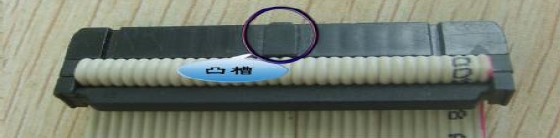
Figure 1-2
(3). Turn on the power. The indicate light L1 (green light) on the front panel of FDD-UDD is bright, and the L2 (red light) isn’t bright; the numeric LED display C4, waiting to insert the USB Flash Drive. If the numeric LED display EX, it is abnormal. When abnormity, please check the data wire and power wire. If the 34-pin FDD data wire are straight connect wire (the 34-pin FDD data wire in common PC have seven wires are contrary) or the machine has the characteristic, after connection, the red light will light, modify the jumper of J1 and J2 in the FDD-UDD internal. The jumper is in the 2-3 pin of J2 in default. Change the jumper until the FDD-UDD work normally: the red light doesn’t light when there is no operation, and when operation the red light is light.
2. Prepare the USB Flash Drive
Before using the USB Flash Drive, the USB Flash Drive must be formatted.
Option 1: Use format tools to format the USB Flash Drive
Use the “format tools software” of Yisung FDD-UDD.
Insert the USB Flash Drive to the computer USB, run the “format tools software”, according the information to finish the format of “FDD-UDD_EX”. One USB Flash Drive can be formatted as 100 floppy disks.
The detail information can consult the “Format tools software Usage Manual”
Option 2: FDD-UDD format by manual (new function)
Use FDD-UDD to format USB Flash Drive, applied to the environment which has difficult to use format tools or temporarily format the USB Flash Drive. It is difficult to format many disks, switch to current disk and then format.
Insert the USB Flash Drive to the USB in FDD-UDD.
Press the K1 (right key) for five seconds, the numeric LED display “F5”, preparing to format.
Press the K2 (left key) for five seconds, the numeric LED display “F.5.”, format the current disk
After formatting, display the current disk number.
If want to format other disk, first switch to the disk via K1 and K2, then following the upper steps. One USB Flash Drive can be formatted as 100 floppy disks.
Option 3: Format in DOS
Make sure that the floppy has started in BIOS. This method is used in DOS system and industrial device, or the user has difficult to use the format tools.
Connect the FDD-UDD to the FDD interface (consult the FDD-UDD installation), insert the USB Flash Drive to the USB in FDD-UDD. Use FORMAT A: command in DOS. The using method is the same with format floppy. After formatting, there is a piece of information about format the next disk. Then accord requirement to decide whether to format the next disk. One USB Flash Drive can be formatted as 100 floppy disks.
Option 4: Device format
The device has the characteristic of format in itself.
Connect the FDD-UDD to the device (consult the FDD-UDD installation), insert the USB Flash Drive to USB in FDD-UDD, use the format command (or button) in the device to format USB Flash Drive One USB Flash Drive can be formatted as 100 floppy disks.
3. Use the FDD-UDD
(1). Information about the front panel
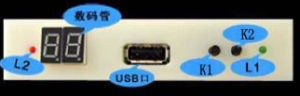
Figure 3-1
L1: green light: power indication light. Light means the power is turned on.
L2: red light: work indication light. Bright means the FDD-UDD is working.
Numeric LED: display the type of product when USB Flash Drive doesn’t insert. FDD-UDD EX144 display C4.
Display the disk number after inserting the USB Flash Drive, 00 is in default, switch from 00 to 99 through K1 and K2.
Press-key K1: turn to the next. Used to turn to the next file (00-99) and create file folder.
Press-key K2: turn to the former. Used to turn to the former (00-99) and create file folder.
(2). Turn on the power, insert the USB Flash Drive which has created file folder. L1 (green light) is on, the L2 (red light) is not bright. The display of numeric is from C4 to 00 . Switch to the disk through K1 and K2 from 00 to 99 .
(3). Read/write in USB Flash Drive, the method is the same with operation on FDD. When read/write USB Flash Drive, L2 (red light) is bright.
(4). After reading/writing USB Flash Drive, L2 (red light) will extinguish. Pull out the USB Flash Drive in several seconds, the internal state inspect system will auto start, numeric LED display C4, FDD-UDD will stop working. Insert the USB Flash Drive again, the internal state inspect system will auto recognize, numeric LED display 00, the FDD-UDD will work again, no need to reset.
Note: L2 (red light) is bright, means the USB Flash Drive is storing or getting data, don’t pull the USB Flash Drive out, avoid lose data.
4. Environment
Temperature: 0℃~65℃
Voltage: 4.5~5.5V
5. Service
Guarantee to keep it in good repair for one year, and offer the tech service for its life. |